
Questions:
- How can I find files?
- How can I find things in files?
Objectives:
- Use
grepto select lines from text files that match simple patterns. - Use
findto find files whose names match simple patterns. - Use the output of one command as the command-line argument(s) to another command.
- Emphasize the use of
helpandmanto use commands
Explain what is meant by ‘text’ and ‘binary’ files, and why many common tools don’t handle the latter well.
In the same way that many of us now use “Google” as a verb meaning “to find”, Unix programmers often use the word “grep”. “grep” is a contraction of “global/regular expression/print”, a common sequence of operations in early Unix text editors. It is also the name of a very useful command-line program.
grep finds and prints lines in files that match a pattern.
For our examples,
we will use a file that contains three haikus taken from a
1998 competition in Salon magazine. For this set of examples,
we’re going to be working in the data-shell/writing subdirectory:
$ cd
$ cd Desktop/data-shell/writing
$ cat haiku.txt
The Tao that is seen
Is not the true Tao, until
You bring fresh toner.

With searching comes loss
and the presence of absence:
"My Thesis" not found.

Yesterday it worked
Today it is not working
Software is like that.
Forever, or Five Years
We haven’t linked to the original haikus because they don’t appear to be on Salon’s site any longer. As Jeff Rothenberg said, “Digital information lasts forever — or five years, whichever comes first.” Luckily, popular content often has backups.
Let’s find lines in haiku.txt that contain the word “not”:
$ grep not haiku.txt
Is not the true Tao, until
"My Thesis" not found
Today it is not working
Here, not is the pattern we’re searching for. The grep command searches through the file, looking for matches to the pattern specified. To use it type grep, then the pattern we’re searching for (not) and finally the name of the file (or files) we’re searching in (haiku.txt).
The output is the three lines in the file that contain the letters not. NOTE that grep returns
lines of files!
By default, grep searches for a pattern in a case-sensitive way. In addition, the search pattern we have selected does not have to form a complete word, as we will see in the next example.
Let’s search for the pattern: The.
$ grep The haiku.txt
The Tao that is seen
"My Thesis" not found.
This time, two lines that include the letters The are output,
one of which contained our search pattern within a larger word, Thesis.
To restrict matches to lines containing the word The on its own,
we can give grep with the -w flag.
This will limit matches to word boundaries. This does not necessarily
mean single words (as we will see later), and it does not change the
way grep returns lines of files.
Later in this lesson, we will also see how we can change the search behavior of grep with respect to its case sensitivity.
$ grep -w The haiku.txt
The Tao that is seen
Note that a “word boundary” includes the start and end of a line, so not just letters surrounded by spaces.
Sometimes we don’t
want to search for a single word, but a phrase. This is also easy to do with
grep by putting the phrase in quotes. grep will then treat the phrase in quotes as the
PATTERN, and we can still use the -w flag to place word boundaries on the pattern.
$ grep -w "is not" haiku.txt
Today it is not working
We’ve now seen that you don’t have to use quotes around single words, but quotes are essential when searching for multiple words. Quotes also help make it easier to distinguish between the search term or phrase and the file being searched. We will always use quotes in the remaining examples.
Another useful flag is -n, which numbers the lines that match the pattern.
NOTE that the line number is separated from the matching line by a “colon” character.
$ grep -n "it" haiku.txt
5:With searching comes loss
9:Yesterday it worked
10:Today it is not working
Here, we can see that lines 5, 9, and 10 contain the letters “it”.
We can combine flags as we do with other Unix commands.
For example, let’s find the line numbers and lines that contain the word “the”. We can combine
the flag options -w and -n to match the pattern “the”:
$ grep -n -w "the" haiku.txt
2:Is not the true Tao, until
6:and the presence of absence:
Here’s a new flag, -i which grep can use to make our search case-insensitive:
$ grep -n -w -i "the" haiku.txt
1:The Tao that is seen
2:Is not the true Tao, until
6:and the presence of absence:
Here is another flag option that is very useful. We can use -v to invert
our search, i.e., we want to output
the lines that do not match the word “the”.
$ grep -n -w -v "the" haiku.txt
1:The Tao that is seen
3:You bring fresh toner.
4:
5:With searching comes loss
7:"My Thesis" not found.
8:
9:Yesterday it worked
10:Today it is not working
11:Software is like that.
Wait! Why is line #1 is found in both searches? Because grep -n -w -i "the" haiku.txt
is case insensitive, while grep -n -w -v "the" haiku.txt is case sensitive!
To output the exact opposite matches for grep -n -w -i "the" haiku.txt, we need
to use: grep -n -w -v -i "the" haiku.txt. Now you begin to see how precise
the grep command can be while searching for patterns!
grep has lots of other options. To find out what they are, we can type:
grep --help on Windows, or man grep on a Mac:
Usage: grep [OPTION]... PATTERN [FILE]...
Search for PATTERN in each FILE or standard input.
PATTERN is, by default, a basic regular expression (BRE).
Example: grep -i 'hello world' menu.h main.c

Regexp selection and interpretation:
  -E, --extended-regexp     PATTERN is an extended regular expression (ERE)
  -F, --fixed-strings       PATTERN is a set of newline-separated fixed strings
  -G, --basic-regexp        PATTERN is a basic regular expression (BRE)
  -P, --perl-regexp         PATTERN is a Perl regular expression
  -e, --regexp=PATTERN      use PATTERN for matching
  -f, --file=FILE           obtain PATTERN from FILE
  -i, --ignore-case         ignore case distinctions
  -w, --word-regexp         force PATTERN to match only whole words
  -x, --line-regexp         force PATTERN to match only whole lines
  -z, --null-data           a data line ends in 0 byte, not newline

Miscellaneous:
...        ...        ...
Using grep with Wildcards
grep’s real power doesn’t come from its options, though; it comes from
the fact that patterns can include special wildcards. (The technical name for
these is regular expressions, which
is what the “re” in “grep” stands for.) Regular expressions can be very complex
and if you want to do complex searches, please look at the lesson
on the Software Carpentry website.
Another great resource is: RegexOne
For a small taste of what these special wildcards can do, let’s
find all the lines in haiku.txt that have an ‘o’ in the second position of the line:
$ grep -E '^.o' haiku.txt
You bring fresh toner.
Today it is not working
Software is like that.
We use the -E flag to tell grep that we are going to use a
PATTERN that is an extended regular expression. We
also put the pattern in quotes to prevent the shell
from trying to expand the regular expression before it runs grep just
like it would for a wildcard.
In other words, -E means we will be changing to regular expression wildcards which are
different than the wildcards in the shell. For example, ^ in the pattern
is like a wildcard that only matches the start of the line. Then the •
*matches any single character (just like ? in the shell), while the o
matches the actual letter “o”. So we are asking grep to output all the lines
that start with any one character followed by an “o” character.
Combining Shell Commands: Tracking a Species
Now we are going to create a much more complicated script. But don’t worry because you have already covered all the commands you need for this script, and we will give you some hints. But it will take some thought and probably some (Hint#1) testing!
Nelle’s undergraduate project
Nelle is careful to save all her data, and she has
some old data from an undergraduate project with several hundred
data files saved in the data-shell\data\animal-counts directory.
Each file has dates, species, and the counts of each species seen, formatted like this:
2013-11-05,deer,5
2013-11-05,rabbit,22
2013-11-05,raccoon,7
2013-11-06,rabbit,19
2013-11-06,deer,2
Nelle wants to look through all or some of these files to
find the number of any animals she counted, on any date.
But she only wants data for one species at a time. Nelle knows she needs
to write a powerful script, but the script needs to be flexible,
because there are so many files, and she saw a lot of different animals!
She decides to write count-species.sh where she will tell the script
which species to search for, and which directory to search.
Nelle decides to write a shell script count-species.sh where she will tell the script
which species to search for, and which directory to search. In other words
the script uses species as the first command-line argument
and a directory as the second argument.
Nelle knows she can use special variables more than once within a script, and
decides the script should output only one file called <species>.txt. The output
file only contains dates and the number of that species counted on each date.
To be clear, she wants to run a script like this:
bash count-species.sh <species> <directory>
AND, using the data file as shown above, the script will create a file named
for the species (e.g. when searching for “rabbit” it would produce rabbit.txt) that would contain:
2013-11-05,22
2013-11-06,19
Nelle figured this out in only a few minutes of going through her old notes on writing scripts. But we don’t have time in class to review all our old lectures, so to help us create the script, let’s try putting these commands, special variables, and pipes in the correct order:
cut -d : -f 2
>
|
grep -w $1 -r $2
|
$1.txt
cut -d , -f 1,3
Hint#1 Testing Look carefully at what happens when you type
grep -w rabbit -r .?
Hint#2: use man grep (or grep --help) to look for how to grep text
recursively in a directory and review man cut (or cut --help) to select more
than one field in a line.
Hint#3: It might help to start by focusing on just one species.
For this lesson at least one example of this file type is provided as data-shell/data/animal-counts/animals.txt
and some of you might have another file called more-animals.txt in the same directory.
(try not to look at the answer!)
..
..
..
..
..
Solution
grep -w $1 -r $2 | cut -d : -f 2 | cut -d , -f 1,3 > $1.txt
For each animal, you would call the script above like this:
$ bash count-species.sh bear .
The special variable $1 is the species name, and the special variable $2
is the directory (in this case, the current working directory or .).
grep and Little Women
A couple more useful grep flags: -o and -c
You and your friend, having just finished reading Little Women by
Louisa May Alcott, are in an argument. Of the four sisters in the
book, Jo, Meg, Beth, and Amy, your friend thinks that Jo was the
most mentioned. You, however, are certain it was Amy. Luckily, you
have a file LittleWomen.txt containing the full text of the novel
(data-shell/writing/data/LittleWomen.txt).
Using a for loop, how would you tabulate the number of times each
of the four sisters is mentioned? Can we think of a couple different solutions?
Hint: one solution might employ
the commands grep and wc and a |, while another might utilize
grep options only.
New grep Flags
-
The
-oflag changesgrep’s default output from lines, to only showing the matching pattern within the line! -
Remember the
-wflag uses word boundaries to make sure that only complete words are matched (this isn’t completely new) -
The
-cflag tellsgrepto “print only a count of selected lines per FILE”.
.. So let’s try some things:
$ grep "jo" LittleWomen.txt | wc -l
284

$ grep "Jo" LittleWomen.txt | wc -l
1528
The first thing we remember is that capitalization matters! We need to be looking for “Jo”, not “jo”
$ grep "Jo" "Meg" "Beth" "Amy" LittleWomen.txt | wc -l
grep: Meg: No such file or directory
grep: Beth: No such file or directory
grep: Amy: No such file or directory
1528
Now we remember that grep only takes one pattern at a time, so we’ll
probably have to create a for loop to enter all the names.
Let’s use “sis” as the variable name:
$ for sis in Jo Meg Beth Amy
> do
> grep $sis LittleWomen.txt | wc -l
> done
1528
685
463
643
Now it looks very promising! But let’s add some output that helps us identify
which count goes with which name (think about if we made this a script). So we hit the up arrow and edit the command by adding echo $sis:; like this:
$ for sis in Jo Meg Beth Amy; do echo $sis:; grep $sis LittleWomen.txt | wc -l; done
Jo:
1528
Meg:
685
Beth:
463
Amy:
643
This looks great and we are building up our commands into a script just like we learned to do it. But now lets add the new flags:
$ for sis in Jo Meg Beth Amy; do echo $sis:; grep -o $sis LittleWomen.txt | wc -l; done
Jo:
1543
Meg:
685
Beth:
465
Amy:
645
This is different! We have MORE counts of each name! The reason is that the
-o flag matches the pattern (e.g. “Jo”) and then outputs and counts it.
This is important because now even if there are
multiple matches to “Jo” on a single line, they will be output separately.
This seems like we are finished, but we still have another problem…
We are looking for a pattern like “Jo”, but that will also match “John”.
We can find any “John” patterns by running:
$ grep -o John LittleWomen.txt | wc -l
167
So our command isn’t finished. How can we match “Jo”, without matching “John” (or JoAnne, or Jonathan, or any other pattern like “Jo”)?
We can use word boundaries which is what the flag -w does. The -w flag
forces grep to match only a whole word. This means “Jo” only matches “Jo”! Let’s try it:
$ for sis in Jo
> do
> echo $sis:
> grep -ow $sis LittleWomen.txt | wc -l
> done
Jo:
1355
and when we use all the daughter’s names:
Solution1
$ for sis in Jo Meg Beth Amy
> do
> echo $sis:
> grep -ow $sis LittleWomen.txt | wc -l
> done
Jo:
1355
Meg:
683
Beth:
459
Amy:
645
**This is the answer!* Congratulations on building up a new command that finds exactly the names of the daughters, and counts them even if they are on the same line.
Using the -c flag (Solution 2)
But we saw in the help file that -c counts the number of lines also.
What if we just used -c instead of piping the output to wc -l?
for sis in Jo Meg Beth Amy
do
    echo $sis:
    grep -ocw $sis LittleWomen.txt
done
Jo:
1347
Meg:
683
Beth:
457
Amy:
643
The second solution is not quite as good and reports fewer name counts!
To discover why, let’s look at the grep --help file
(or man page for grep) again more closely.
The -o flag changes grep’s default output from lines, to only
showing the matching pattern within the line!
The -w flag uses word boundaries to make sure that only
exactly “Jo”, “Meg”, “Beth”, or “Amy” will be matched.
If you output grep -ow to the terminal (the same as stdout),
each time a name is found, it ends up on a different terminal
line. When you pipe those to wc -l you get a
count of all stdout lines with exact matches to the sisters’ names.
Using -c in the second solution, the help says:
”-c, --count print only a count of selected lines per FILE”
In the second solution grep -ow correctly finds all exact matches
of the sisters’ names, but these are not output as stdout
(as if they went to the terminal) because
grep -c only counts and reports the number of
lines in the file… these lines may have
more than one match per line. The total number of matches reported by lines,
will be always lower if there is more than one match per line.
If this is still confusing, try breaking down the loops into single commands, or try running these commands looking for only “Jo” and carefully study the difference in the outputs:
Remember the first loop below is the correct answer:
$ for sis in Jo; do echo $sis:; grep -ow $sis LittleWomen.txt | wc -l; done
Jo:
1355
Now examine these loops:
$ for sis in Jo; do echo $sis:; grep -o $sis LittleWomen.txt | wc -l; done
Jo:
1543
Without word boundaries in the above loop, any line with “Jo” including (e.g.) “John” is used as
stdout (on separate lines) and then counted.
$ for sis in Jo; do echo $sis:; grep -w $sis LittleWomen.txt | wc -l; done
Jo:
1347
The above loop correctly matches “Jo” using word boundaries, but the stdout
uses the grep default of returning complete lines. Anytime “Jo” is matched
multiple times on a line, it only counts as one line.
$ for sis in Jo; do echo $sis:; grep -c $sis LittleWomen.txt; done
Jo:
1528
The above loop matches any line with a “Jo” including words like (e.g.) “John”,
(or JoAnne, or Jonathan, or any other pattern like “Jo”), and it will match
multiple instances of “Jo” or “John, (etc.)” on a line. This is similar to grep
default behavior except it outputs only the number of lines, instead of
the lines themselves.
$ for sis in Jo; do echo $sis:; grep -cw $sis LittleWomen.txt; done
Jo:
1347
The above loop correctly matches “Jo” using word boundaries, but when “Jo” occurs
multiple times on the same line, they are only counted once because of the -c flag.
There is often more than one way to solve a programming task, so a particular solution is usually chosen based on a combination of yielding the correct result, elegance, readability, and speed. No one should expect that they will be able to determine the “best” way to answer questions when first starting to learn programming.
Using find
While grep finds lines in files, the find command finds files themselves.
The find command has too many options to cover in this lesson,
so we will discuss a few options for find using the directory file
structure shown below.
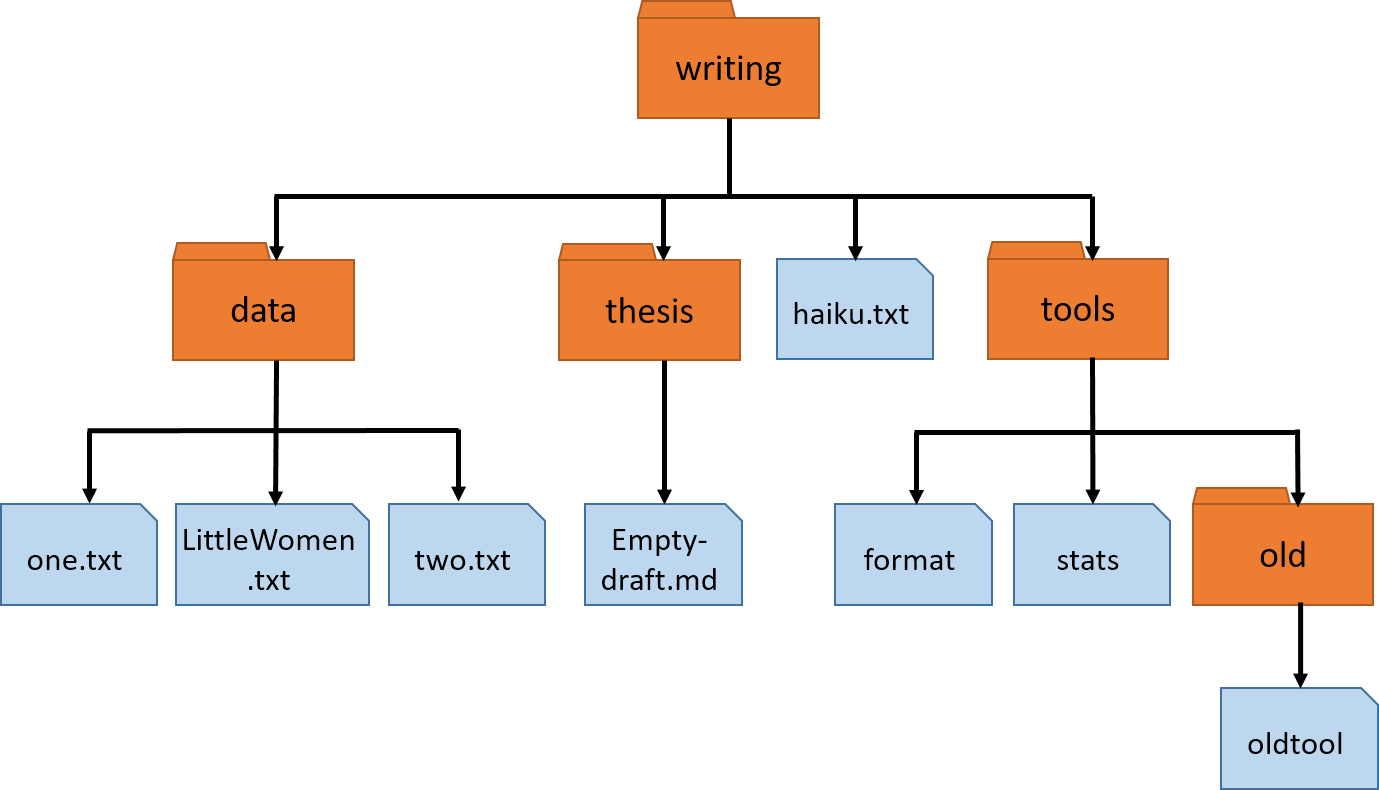
Nelle’s writing directory contains one file called haiku.txt and three subdirectories:
thesis (which contains a sadly empty file, empty-draft.md);
data (which contains three files LittleWomen.txt, one.txt and two.txt);
and a tools directory that contains the programs format and stats,
and a subdirectory called old, with a file oldtool.
For our first command,
let’s run find ..
$ find .
.
./data
./data/one.txt
./data/LittleWomen.txt
./data/two.txt
./tools
./tools/format
./tools/old
./tools/old/oldtool
./tools/stats
./haiku.txt
./thesis
./thesis/empty-draft.md
As always,
the . on its own means the current working directory,
which is where we want our search to start. After that, the objects
find displays are not listed in any particular order.
find’s output includes the names of every file and directory
under the current working directory.
This seems useful but find has many other options
to filter the output and in this lesson we will discover some
of them.
The first option in our list is
-type d that means “things that are directories”.
Sure enough,
find’s output is the names of the five directories in our little tree
(including .):
$ find . -type d
./
./data
./thesis
./tools
./tools/old
If we change -type d to -type f,
we get a listing of all the files instead:
$ find . -type f
./haiku.txt
./tools/stats
./tools/old/oldtool
./tools/format
./thesis/empty-draft.md
./data/one.txt
./data/LittleWomen.txt
./data/two.txt
Now let’s try matching by name:
$ find . -name *.txt
./haiku.txt
This is different! We might have expected it to find all the text files
in all the directories,
but find only displays ./haiku.txt.
This is because, as we have said before, the shell expands wildcard characters
like * before commands run.
When the shell saw *.txt it immediately expanded it in the
current directory to haiku.txt before doing anything else. So the command
we actually ran was:
$ find . -name haiku.txt
find did what we asked! It found a *.txt file in the
current working directory and it was finished!
To get all the text files,
let’s do what we did with grep and
put *.txt in quotes to prevent the shell from expanding the * wildcard.
This way, find is presented with the pattern *.txt!
$ find . -name '*.txt'
./data/one.txt
./data/LittleWomen.txt
./data/two.txt
./haiku.txt
Listing vs. Finding
Understand that in these examples the find command works harder
than commands we’ve seen in other lessons!
Remember the command find . -name *.txt stops
because it is done when it finds haiku.txt. To be clear, it’s done because
wildcards expand first and specifically as “find a *.txt file in the current working directory”.
However, if no .txt file is present in the current working directory, find will begin at
the current working directory, and continue finding .txt files!
We won’t worry about this process for
now, because we’ll always use quotes around our arguments with wildcards.
Just be aware that this behavior can happen.
lsandfindcan be made to do similar things given the right options, but under normal circumstances,lslists everything it is told to list, whilefindsearches for things with certain properties and patterns, then shows them.
Using $() to combine commands
The command line’s power lies in combining tools, and we’ve seen how to do that with pipes;
Now let’s look at another way to combine tools using $().
We know that find . -name '*.txt' gives us a list of all
text files in or below the current directory.
It’s possible to combine that with wc -l to count the lines in all those files.
The simplest way to combine these tools is to put the find command inside $():
$ wc -l $(find . -name '*.txt')
11 ./haiku.txt
300 ./data/two.txt
21022 ./data/LittleWomen.txt
70 ./data/one.txt
21403 total
This is kind of like Math again! When the shell executes this command,
the first thing it does is run whatever is inside the $().
Then the $() expression is given to the command, and used to generate the command’s output.
In this case, find outputs four filenames, and then wc -l gives us the
number of lines in each file
./data/one.txt
./data/LittleWomen.txt
./data/two.txt
./haiku.txt`
and the shell puts all these together into the command:
$ wc -l ./data/one.txt ./data/LittleWomen.txt ./data/two.txt ./haiku.txt
This is what we wanted! When you think about it, this expansion is
exactly what the shell does when it expands wildcards like * and ?,
but using $() lets us turn any command we want into our own “wildcard”.
NOTE: It’s very common to use find and grep together
because find can locate files that match a pattern,
and grep identifies lines inside those files that match another pattern.
To demonstrate how this works, without leaving Nelles writing directory,
let’s find .pdb files that contain iron atoms
by looking for the string “FE” in all the .pdb files
in Nelles data-shell/data/pdb directory.
$ grep "FE" $(find ../data/pdb/ -name '*.pdb')
../data/pdb/heme.pdb:ATOM     25 FE           1      -0.924   0.535  -0.518
The grep and find combination can be really powerful!
Matching and Subtracting
We learned the -v flag for grep inverts pattern matching, so that only lines
which do not match the pattern are printed.
For example, we can use grep to look for lines in haiku.txt that do NOT
contain the word is:
$ grep -vw 'is' haiku.txt
Is not the true Tao, until
You bring fresh toner.

With searching comes loss
and the presence of absence:
"My Thesis" not found.

Yesterday it worked
Once again, notice that the pattern “Is” does not match the pattern “is”
and so “Is” is not subtracted by the -v flag.
Capitalizations matters! Also “Thesis” was not matched (and thus subtracted)
because of word boundaries.
Knowing this about grep, let’s first change into the data-shell/data/pdb
directory, then examine the following commands to detemine which will
show us:
- all files whose names end in “
l.pdb”, - but do not contain the pattern
meth? (e.g.,nerol.pdb)
Once you have thought about your answer, you can test the commands below: (If working virtually, these will be in the chat box)
find . -name '*l.pdb' | grep -v methfind . -name *l.pdb | grep -v meth*
Solution
-
The correct answer is 1. Putting the wildcard match pattern in quotes prevents the shell from expanding the wildcard, and the filenames are iterated through, and passed to the
findcommand. Thefindcommand outputs the names of the files to thegrepcommand. -
Option 2 is incorrect because the shell expands
*l.pdbfirst instead of passing the wildcard expression tofind.
*An error occurs that is unclear:
find: paths must precede expression: citronellal.pdb
find: possible unquoted pattern after predicate `-name'?
The error is due to the immediate expansion of the wildcard such that the actual command is something like:
find . -name cholesterol.pdb citronellal.pdb cyclohexanol.pdb ethanol.pdb (etc.)
However, the find command thinks it is done when it finds the
first filename with a perfect match:
cholesterol.pdb. Subsequent names passed to find (i.e. citronellal.pdb) are
not understood (because cholesterol.pdb is not a path).
findPipeline Reading ComprehensionProvide a short explanatory comment for the following shell script:
wc -l $(find . -name '*.dat') | sort -nSolution
- First (like math) find all files with a
.datextension in the current directory- Count the number of lines in each of these files and rather than display them, pass output to
sort- Sort the output from step 2. numerically
Unfortunately, we don’t have any .dat files in the pdb directory!
So where are the .dat files? This is a great question! Let’s find them!
Assuming .dat files are somewhere in our lesson directory structure, they must be within or below
the data-shell directory, which is two directories up from our current
working directory. We can check this with pwd:
$ pwd
/c/Users/<username>/Desktop/data-shell/data/pdb
So to find all the .dat files, we need to use find starting at the path ../..
$ find ../.. -name "*.dat"
../../creatures/backups/original-basilisk.dat
../../creatures/backups/original-unicorn.dat
../../creatures/basilisk.dat
../../creatures/one unicorn.dat
../../creatures/unicorn.dat
(Your output might be slightly different)
The output ../../creatures/one unicorn.dat kind of unexpected! This
file has a space in the name: “one unicorn.txt”! Remember
that find works a little harder than most commands, so it searched for
and found a name that contains spaces.
So what happens if we then finish our command and pass those filenames
to the wc -l command?
$ wc -l $(find ../.. -name "*.dat") | sort -n
wc: ../../creatures/one: No such file or directory
wc: unicorn.dat: No such file or directory
 163 ../../creatures/backups/original-basilisk.dat
 163 ../../creatures/backups/original-unicorn.dat
 163 ../../creatures/basilisk.dat
 163 ../../creatures/unicorn.dat
 652 total
It works, but what about the errors?
There are 163 lines in basilisk.dat and unicorn.data and their backups.
In this case the sort -n didn’t really do anything.
The errors occur because unlike find, the wc -l command does NOT process filenames with spaces.
Instead, wc looks for a directory named ../../creatures/one (data-shell/creatures/one)
which does not exist. Similarly, a file named unicorn.dat can’t be found in the
data-shell/creatures/one directory (because it doesn’t exist).
Very Advanced: Finding Files With Different Properties
Using the help or man pages of
findThefindcommand can be given several other criteria known as “tests” to locate files with specific attributes, such as creation time, size, permissions, or ownership. Use--helporman findto explore these topics, and then write a single command to:
- find all files in or below the current directory
- that were modified by the user
nelle- in the last 24 hours.
Hint 1: We won’t use the
$()format but you will need to use three tests:-type,-mtime, and-user.Hint 2: You are going to need a lot of help!
At the end of
helpyou see thatfindis maintained at “http://savannah.gnu.org/”, where you can get more help (do not email). Also, you can use a search engine, or go to Indiana U. where there is a great help section for shell commands.Hint 3: The
-mtimeuses integer values that are days (24-hours). So the past WEEK would be-mtime -7. Why would the value need to be negative?Solution
Assuming that Nelle’s home is our working directory we type:
$ find ./ -type f -mtime -1 -user nelleBut this is not satisfying because user
nelledoesn’t exist on our laptops or desktops! To see this command working we will have to use our own username. Usels -lto find your username, then substitute it into the following command:$ find ./ -type f -mtime -60 -user <username>
Congratulations on finishing the grep and find lesson! You learned a lot but
you will use these commands a lot too!
Keypoints:
findfinds files with specific properties that match patterns.grepselects lines in files that match patterns.--helpis a flag supported by many bash commands, and programs that can be run from within Bash, to display more information on how to use these commands or programs.man commanddisplays the manual page for a given command.$(command)Can be used to generate a command’s output for other commands.