
Questions:
- How can I save and re-use commands?
Objectives:
- Write a shell script that runs a command or series of commands for a fixed set of files.
- Run a shell script from the command line.
- Write a shell script that operates on a set of files defined by the user on the command line.
- Create pipelines that include shell scripts you, and others, have written.
Nelle’s Shell Works Well!
Nelle finished her analyses in plenty of time, and wrote her manuscript. She continues to use her scripting skills, even after she has graduated and moved on to a new position. Her new colleagues are a group of scientists in Antarctica, who perform similar studies with gelatinous marine life, and Nelle has improved her coding skills. Now she’s ready to use the shell as a powerful programming environment. We will follow along with Nelle as she takes commands we repeat frequently, and converts them into script files which can re-run all those analyses by typing a single command.
For historical reasons, a bunch of commands saved in a file is usually called a shell script, but make no mistake: these are actually small programs. They usually end in
.sh
To catch up with Nelle, we will start by going back to Nelle’s molecules/
directory. From there we will open a new file using the command nano middle.sh.
which will become our shell script:
$ cd molecules  (or: cd \Users\nelle\Desktop\data-shell\molecules)
$ nano middle.sh
Let’s insert the following line:
head -n 15 octane.pdb | tail -n 5
This is a variation on the pipe we constructed earlier:
it selects lines 11-15 of the file octane.pdb.
Remember, we are not running it as a command just yet:
we are putting the commands in a file.
Then we save the file (Ctrl-O in nano),
and exit the text editor (Ctrl-X in nano).
Check that the directory molecules now contains a file called middle.sh.
Once we have saved the script file,
we can ask the shell to execute the commands it contains.
Our shell is called bash, so we run the following command:
$ bash middle.sh
ATOM      9  H           1      -4.502   0.681   0.785  1.00  0.00
ATOM     10  H           1      -5.254  -0.243  -0.537  1.00  0.00
ATOM     11  H           1      -4.357   1.252  -0.895  1.00  0.00
ATOM     12  H           1      -3.009  -0.741  -1.467  1.00  0.00
ATOM     13  H           1      -3.172  -1.337   0.206  1.00  0.00
Sure enough, our script’s output is exactly what we would get if we ran that pipeline directly.
But we want to select lines from any file in the directory, not just octane.pdb.
We could edit middle.sh each time to change the filename,
but that would probably take longer than just retyping the command.
Instead, let’s edit middle.sh and make it more versatile:
$ nano middle.sh
Now, within nano, replace the text octane.pdb with the special variable called $1:
head -n 15 "$1" | tail -n 5
Inside a shell script,
$1 means “the first filename (or value, or input) on the command line“.
We can now run our script with any file in the directory. Here
is octane.pdb again:
$ bash middle.sh octane.pdb
ATOM      9  H           1      -4.502   0.681   0.785  1.00  0.00
ATOM     10  H           1      -5.254  -0.243  -0.537  1.00  0.00
ATOM     11  H           1      -4.357   1.252  -0.895  1.00  0.00
ATOM     12  H           1      -3.009  -0.741  -1.467  1.00  0.00
ATOM     13  H           1      -3.172  -1.337   0.206  1.00  0.00
and here’s a different file:
$ bash middle.sh pentane.pdb
ATOM      9  H           1       1.324   0.350  -1.332  1.00  0.00
ATOM     10  H           1       1.271   1.378   0.122  1.00  0.00
ATOM     11  H           1      -0.074  -0.384   1.288  1.00  0.00
ATOM     12  H           1      -0.048  -1.362  -0.205  1.00  0.00
ATOM     13  H           1      -1.183   0.500  -1.412  1.00  0.00
Pretty sweet. But before we move on, there’s an important cautionary note we need to make right away regarding the use of spaces in filenames:
Use Double-Quotes Around Arguments
It’s very common practice to use double-quotes all the time for arguments. Earlier, we put the loop variable inside double-quotes, in case the filename happens to contain any spaces, For the SAME reason, we will often surround special variables like
$1with double-quotes.
So middle.sh script is great if we always want lines 11 through 15 of each file,
but if we want to change the lines that are output, we would still need to
edit middle.sh each time.
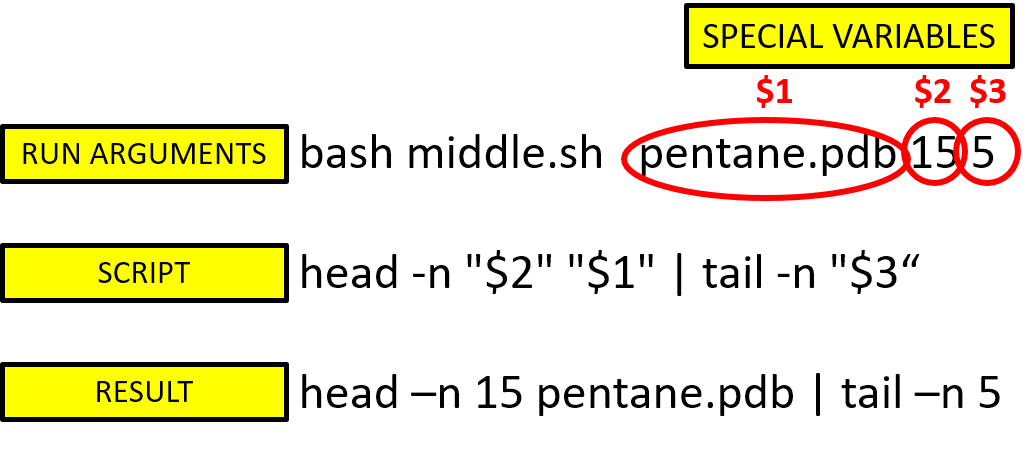
Let’s fix that by using more special variables like $2 and $3 for the
number of lines to be passed to head and tail respectively:
$ nano middle.sh
head -n "$2" "$1" | tail -n "$3"
We can now run:
$ bash middle.sh pentane.pdb 15 5
ATOM      9  H           1       1.324   0.350  -1.332  1.00  0.00
ATOM     10  H           1       1.271   1.378   0.122  1.00  0.00
ATOM     11  H           1      -0.074  -0.384   1.288  1.00  0.00
ATOM     12  H           1      -0.048  -1.362  -0.205  1.00  0.00
ATOM     13  H           1      -1.183   0.500  -1.412  1.00  0.00
By changing the arguments to our command we can change our script’s output:
$ bash middle.sh pentane.pdb 20 5
ATOM     14  H           1      -1.259   1.420   0.112  1.00  0.00
ATOM     15  H           1      -2.608  -0.407   1.130  1.00  0.00
ATOM     16  H           1      -2.540  -1.303  -0.404  1.00  0.00
ATOM     17  H           1      -3.393   0.254  -0.321  1.00  0.00
TER      18              1
Always remember that these special variables are numbered based on where you place them in the command-line argument list. Which is why they are sometimes called the argument’s “positional parameters”.
Just a quick refresher, to make sure everyone understands:
Our script works,
but it may take the next person who reads middle.sh a moment to figure out what it does.
We can improve our script by adding some comments at the top:
$ nano middle.sh

# This selects lines from the middle of a file.
# To use: bash middle.sh filename end_line num_lines
head -n "$2" "$1" | tail -n "$3"
A comment starts with a # character and runs to the end of the line.
The computer ignores comments,
but they’re invaluable for helping people (including your future self) understand and use scripts.
The only caveat is that each time you modify the script,
you should check that the comment is still accurate!
An explanation that sends the reader in the wrong direction is worse than none at all.
Script Magic
What if we want to process many files in a single pipeline?
Let’s start by deciding we want to sort all our .pdb files by length. We would type:
$ wc -l *.pdb | sort -n
because wc -l lists the number of lines in the files
and sort -n sorts things numerically.
We could put this command in a script file,
but then it would only ever sort a list of .pdb files in the current directory.
If we want to be able to get a sorted list of other kinds of files,
we need a way to get all kinds of names into the script.
BUT, we can’t use special variables like $1, $2, and so on
because we don’t know how many files there are (and don’t
want to type in a special variable for each file anyway)!
Instead, we use a different special variable $@,
(you could call it a “super” special variable) which means,
“All the command-line arguments of the shell script.”
"$@" is equivalent to "$1" "$2" ...
We ALWAYS put "$@" inside double-quotes
to handle the case of arguments containing spaces.
Here’s an example using a script we name “sorted.sh”:
$ nano sorted.sh
# Sort filenames by their length.
# Usage: bash sorted.sh one_or_more_filenames
wc -l "$@" | sort -n
Now we can not only sort by lines all the *.pdb files in the molecules directory,
we can add more files to sort, for example, in the creatures directory.
All we have to do is enter the correct path to the files we want to sort!
$ bash sorted.sh *.pdb ../creatures/*.dat
9 methane.pdb
12 ethane.pdb
15 propane.pdb
20 cubane.pdb
21 pentane.pdb
30 octane.pdb
163 ../creatures/basilisk.dat
163 ../creatures/unicorn.dat
Using loops with special variables
Remember when we were learning how to use pipes with the file animals.txt?
Imagine if you had several hundred files, with more fields, all formatted like this:
2012-11-05,deer,5,M
2012-11-05,deer,5,F
2012-11-05,rabbit,12,M
2012-11-05,rabbit,10,F
2012-11-05,raccoon,3,M
2012-11-05,raccoon,7,F
2012-11-06,rabbit,19,M
2012-11-06,rabbit,22,F
2012-11-06,deer,2,M
2012-11-06,deer,0,F
2012-11-06,fox,4,M
2012-11-06,fox,4,F
2012-11-07,rabbit,16,M
2012-11-07,rabbit,12,F
2012-11-07,bear,1,M
2012-11-07,bear,1,F
We can change to the directory data-shell/data/animal-counts/ to find an example of this type
of file named more-animals.txt.
cd ../../data/animal-counts/
Earlier we wrote a pipeline to extract and count the unique species in the file.
Now let’s write a shell script called species.sh that takes any number of
filenames as command-line arguments, and uses cut, sort, and
uniq to print a list of the unique species appearing in each of
those files separately.
Solution
In nano type:
# Script to find unique species in csv files
# where species is the second data field
# This script accepts any number of file names
# as command line arguments

# First it loops over all files
for file in $@
do
	echo "Unique species in $file:"
	# In the loop it extracts species names
	# just like we did before
	cut -d , -f 2 $file | sort | uniq
done
Now run the script:
$ bash species.sh more-animals.txt
Unique species in more-animals.txt:
bear
deer
fox
rabbit
raccoon
By now, you should be feeling proud of yourself! (It probably took Nelle years to learn this stuff!)
Special Variables Table
Here’s a Table of Special Variables for reference purposes
All Special Variables need inputs!
(When we make mistakes)
What happens if a script is supposed to process a bunch of files, but we don’t give it any filenames? For example, what if we type:
$ bash species.sh
In this case NOTHING happens! The script is a LOOP and so the loop
is happy to do nothing if that’s what you want. The line:
for file in "$@" looks for anything in the command line, and finds nothing
so it’s done
On the other hand, if your script runs a direct command
it will stop and wait for input (it’s not done). For example
let’s change to the directory molecules and run the sorted.sh
with no command arguments. Here’s an example from an earlier script we wrote:
$ cd ../../molecules/
$ bash sorted.sh
(You will need to use Ctl-C to exit this script.)
When we aren’t using a loop,
and you don’t give an argument like *.dat (or anything else) the $@
inside of sorted.sh expands to
nothing at all, so the pipeline inside the script is effectively:
$ wc -l | sort -n
wc -l assumes it is supposed to process standard input,
but it doesn’t have any filenames. So wc sits there waiting for a filename
to pipe to sort. From the terminal however, all we see is it
sitting there: The script doesn’t appear to do anything.
When this happens, you will use Control-c (or sometimes
Command-c on a Mac) to exit
the script and return to your prompt. This is another good reason to use
echo to output something to the terminal as your script is running.
Future Nelle Creating a Script Pipeline:
We are almost caught up with Nelle’s scripting skills at this point. When we find Nelle, we discover that Nelle has moved on, to a new position, still working with her gooey marine life. But Nelle never forgot how the supervisor insisted that all her analytics must be reproducible.
The easiest way to capture all the steps in her analyses is in a script. Nelle is much better at scripting now, and wants to rewrite some scripts for analyzing her new data from Antarctica.
First we return to Nelle’s data directory:
$ cd ../north-pacific-gyre/2012-07-03/
She checks her notes and sees her pipeline to run goostats was:
$ for datafile in NENE*[AB].txt; do echo $datafile; bash goostats $datafile stats-$datafile; done
Nelle smiles as she realizes that her past self didn’t make this loop into
a script, with informational comments about how it was used. So Nelle runs
nano creating a file called do-stats.sh and writes the following:
(We can copy the above for loop and paste it into nano to edit)
# Calculate stats for data files.
for datafile in "$@"
do
    echo $datafile
    bash goostats $datafile stats-$datafile
done
Now Nelle can reproduce the first stage of her analysis by typing:
$ bash do-stats.sh NENE*[AB].txt
There are several very notable things about this script.
1. Because the special variable $@ makes her script flexible
it will take everything in the command line as input, so Nelle can also
use piped commands!
$ bash do-stats.sh NENE*[AB].txt | wc -l
Notice first if we run the command without the pipe, we get the 15 filenames. That’s the standard output of the first part of our formula, THIS is then piped into “wc -l” and so the filenames that are normally echoed to the terminal, are inputs for the “wc -l” command. What do you think the results should be?
15 files = fifteen lines! The output is just the number of files processed based on the filename being echoed when every file is used.
2. Nelle’s script is flexible enough to let the person running it decide what files to process.
3. The script did not process the two files with spaces in their names.
This is because goostats can only accept ONE file as input
(and one as output), but the spaces
in NENE02043 A.txt look like two separate input files NENE02043 and A.txt.
So do-stats.sh is flexible enough to be used in a directory with
badly named files, and still work!
4. We did not have to
delete the output files from our previous run of do-stats.sh. The
do-stats.sh script only recognizes files that begin with NENE
so it did not process those files either! (But it did overwrite them!)
BUT there’s more
Nelle could have written the new script so it’s even simpler to run as shown below.
# Calculate stats for Site A and Site B data files.
for datafile in NENE*[AB].txt
do
    echo $datafile
    bash goostats $datafile stats-$datafile
done
Now she just runs bash do-stats.sh
This latter script is good because: It always selects the right files (For example, Nelle doesn’t have to remember to exclude the ‘Z’ files).
But Nelle did not do this because the disadvantage is that it always selects just those
files — Nelle can’t run it on all files!
This will be important in her new position where she uses the NENE*[GH].txt files
to maintain her collaboration with her former supervisor who is creating
new files now. (Unless someone edits the script)
The advantage to Nelle using @$ in do-stats.sh,
is she knows her future self will be able to handle the larger files
from the new colleagues in Antarctica, even though they
use a different filename convention. Her script is flexible!
Nelle then emails do-stats.sh to her former supervisor, who is planning to
write another manuscript on gelatinous marine life.
The History of Nelle’s Figure-3
The shell keeps track of everything that you type.
One thing Nelle learned long ago was that her history could be
very useful for remembering and even writing good scripts.
She remembers creating Figure-3, and then while trying to
make tweak the formatting, she forgot how she started the data analyses!
To re-create the graph all she had to do was output her
history to a file, then edit that file to create the graph again.
The other advantage of using history is she doesn’t need to
type the commands in again (and potentially getting them wrong).
For example:
$ history | tail -n 5 > redo-figure-3.sh
The file redo-figure-3.sh might now contain something like:
297 bash goostats NENE01729B.txt stats-NENE01729B.txt
298 bash goodiff stats-NENE01729B.txt /data/validated/01729.txt > 01729-differences.txt
299 cut -d ',' -f 2-3 01729-differences.txt > 01729-time-series.txt
300 ygraph --format scatter --color bw --borders none 01729-time-series.txt figure-3.png
301 history | tail -n 5 > redo-figure-3.sh
This isn’t a real script, but you can see how some quick work in an
editor can remove the line numbers on the commands,
and remove the final line of the history command.
After Nelle created that figure with separate commands, she now has
a completely accurate record of how she created that figure.
There is a lot of code we haven’t covered in Nelle’s Figure-3, and we can ignore that for now. We will use this method later in the genomics lessons.
We are showing this now because it is common practice
to develop shell scripts by running commands at the shell prompt
to make sure they’re doing the right thing,
then saving the commands in a file for re-use.
This style of work allows people to recycle
what they discover about their data and their workflow.
Remember that with one call to history
and a bit of editing to clean up the output
you can recover and save your work as a shell script.
Optional Class Exercise: Debugging Scripts
Make sure you are still in Nelle’s
north-pacific-gyre/2012-07-03directory, and delete the two files with spaces in the names because we won’t use them anymore.What happens if you create and save the following script called
do-errors.sh, and run it in Nelle’snorth-pacific-gyre/2012-07-03directory:# Calculate stats for data files. for datafile in "$@" do echo $datfile # notice we misspelled datafile bash goostats $datafile stats-$datafile doneWhen you run it:
$ bash do-errors.sh NENE*[AB].txtthe output is blank. To figure out why, re-run the script using the
-xoption:bash -x do-errors.sh NENE*[AB].txtWhat is the output showing you? Which line is responsible for the error?
Solution
The
-xflag causesbashto run in debug mode. This prints out each command as it is run, which will help you to locate errors. In this example, we can see thatechoisn’t printing anything. We have made a typo in the loop variable name! The variabledatfiledoesn’t exist, hence returning an empty string.
Keypoints:
- Save commands in files (usually called shell scripts) for re-use.
bash <filename>runs the commands saved in a file.$@refers to all of a shell script’s command-line arguments.$1,$2, etc., refer to the first command-line argument, the second command-line argument, etc.- Place variables in quotes if the values might have spaces in them.
- Scripts that let users decide what files to process are more flexible and more consistent with built-in Unix commands.