
Questions:
- How can we automate a commonly used set of commands?
Objectives:
- Use the
nanotext editor to modify text files. - Write a basic shell script.
- Use the
bashcommand to execute a shell script. - Use
chmodto make a script an executable program. - Start working with remote computer systems
Moving to a bigger BASH
IMPORTANT! At this point you should two terminal windows open. One is a Pete login window open, and the other is a GitBash window open (for Windows users). If you are a Mac or Linux user, you shoulds have two different terminal windows open.
If you don’t have a “local” terminal window open, you should open one.
We want to take what we’ve been learning, and move to the next level, so let’s do exactly that!
Make sure you are on your Desktop by going to your home directory, and from your home directory, go up one directory to the Desktop. Then check you have the shell_data folder we recently downloaded, and unzipped.
$ cd
$ cd ..
$ ls shell_data
sra_metadata   untrimmed_fastq
We are going to move our entire shell_data file hierachy onto Pete. But before we move shell_data to Pete, we should compress it into a single file that is small and complete. This takes the command tar. Remember we are in our Desktop directory and type:
$ tar -zcvf shelldata.tar.gz shell_data/
This will create a file named shelldata.tar.gz on your desktop!
Now we need to upload shelldata.tar.gz to our Pete home directory.
To do this, while still in your Desktop directory type:
$ scp shelldata.tar.gz <username>@pete.hpc.okstate.edu:/home/<username>/
If you see an warning such as tput: No value for $TERM and no -T specified you can safely ignore it.
You will be asked for your password, and then in just a few seconds, shelldata.tar.gz
will be uploaded. Finally we want to decompress the directories so they are exactly
the same as we had on our local computer. To do this in your Pete login window
(the terminal we told you to leave open) please type:
$ tar -zxvf shelldata.tar.gz
$ ls shell_data
sra_metadata   untrimmed_fastq
We will go over these commands a little later, otherwise you can use the --help or man commands to get information about tar and scp
Writing files for your future self
We’ve used a lot of files that already exist, but what if we want to remember what we did for our research? It’s important that when you start a project, you start a file to document your steps.
To add text to files, we know to use a text editor called Nano. We’re going to create a file to take notes
about what we’ve been doing with the data files in ~/shell_data/untrimmed_fastq.
This is very good practice when working in bioinformatics. Specifically, you should create a file called a README.txt that describes the data files in the directory or documents how the files in that directory were generated. As the name suggests it’s a file that we or others should read to understand the information in that directory. If you already have a README.txt file, that’s good! Let’s open it and describe what we’ve done lately.
Let’s change our working directory (which in this case should be our home directory on Pete)
to ~/shell_data/untrimmed_fastq using cd,
then run nano to create a file called README.txt:
$ cd ~/shell_data/untrimmed_fastq
$ nano README.txt
Write something in your file to describe your data and your analysis.
The files in this directory came from a special stash of teaching files
We will test them for bad data, and write a script to test any similar file
Sequencing file formats (briefly)
The .fastq format:
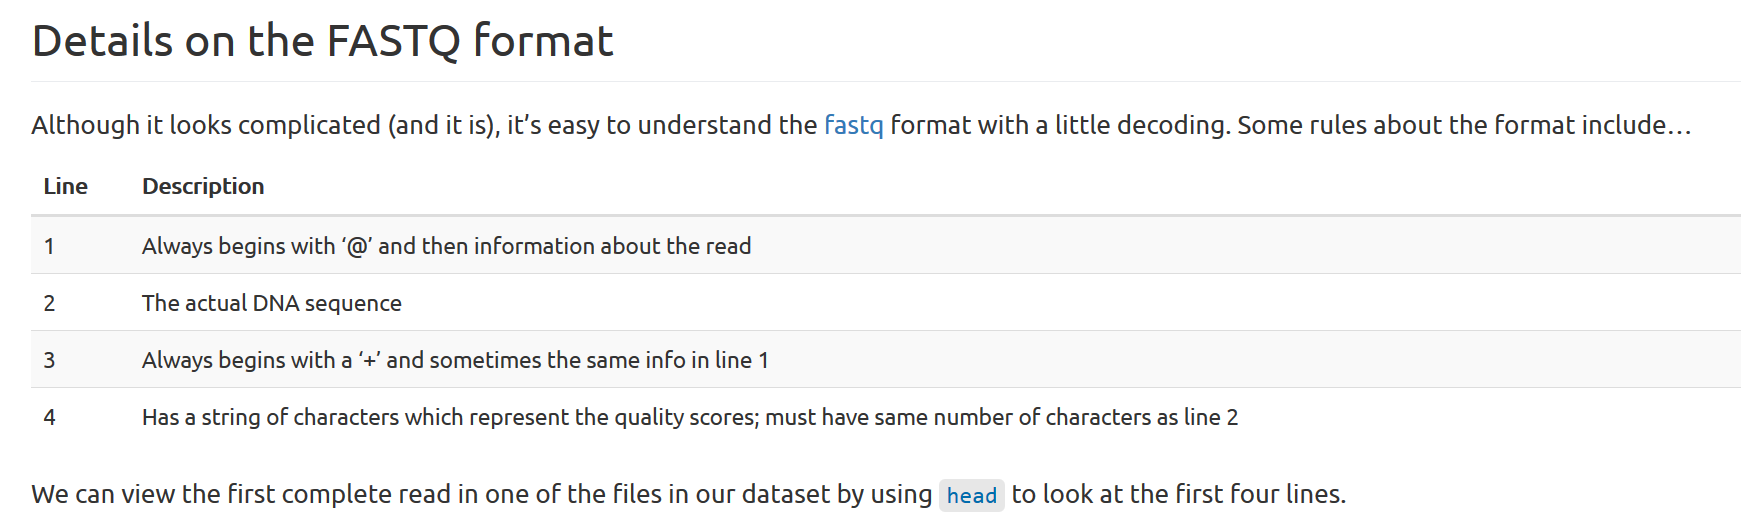
head -n 4 SRR097977.fastq
@SRR097977.1 209DTAAXX_Lenski2_1_7:8:3:710:178 length=36
TATTCTGCCATAATGAAATTCGCCACTTGTTAGTGT
+SRR097977.1 209DTAAXX_Lenski2_1_7:8:3:710:178 length=36
CCCCCCCCCCCCCCC>CCCCC7CCCCCCACA?5A5<
We want the whole FASTQ record, so we’re also going to get the one line before the sequence (using grep -B1) and the two lines after the sequence (using grep -A2). We also want to look in all the files that end with .fastq, so we’re going to use the * wildcard.
Write in something about where these files came from. For example: These files came from my Desktop/data_shell folder.
Writing scripts
A really powerful thing about the command line is that you can write scripts. Scripts let you save commands to run (execute) them and also lets you put multiple commands together. Writing scripts may require an additional time investment initially, but they will save you time when you need to run them repeatedly, like a script looking for bad reads (as shown later). Scripts can also address the challenge of reproducibility: if you need to repeat an analysis, you retain a record of your command history within the script.
With sequencing results you will always want to pull out bad reads! You might also write them to a file to see if you can figure out what’s going on with them. Really bad reads cannot identify if a base is an A, G, C, or T, so it is represented by an “N” character.
One thing we will commonly want to do with sequencing results is pull out bad reads and write them to a file to see if we can figure out what’s going wrong with them. We’re going to look for reads with long sequences of N’s like we did before, but now we’re going to write a script, so we can run it each time we get new sequences, rather than type the code in by hand each time.
Bad reads have a lot of N’s, so we’re going to look for NNNNNNNNNN with grep. Try the following command:
grep -B1 -A2 NNNNNNNNNN *.fastq
There appears to be a lot of bad reads! But what about those two dashes that show up? It turns out that when using grep it uses -- as a placeholder for lines that do not match the pattern. To clean up our output we want to get rid of those paceholders, so we’ll use a second grep, to match the -- and then invert the output with -v flag. Don’t worry about the “backslash” \ character for now, it’s part of using regular expressions which we can discuss later. The command will look like this:
grep -B1 -A2 NNNNNNNNNN *.fastq | grep -v "\--"
Run this command and you can see the double-dashes are all gone.
grep -B1 -A2 NNNNNNNNNN *.fastq > scripted_bad_reads.txt
Now look at the file using the cat scripted_bad_reads.txt command and notice the output:
SRR098026.fastq-@SRR098026.133 HWUSI-EAS1599_1:2:1:0:1978 length=35
SRR098026.fastq:ANNNNNNNNNTTCAGCGACTNNNNNNNNNNGTNGN
SRR098026.fastq-+SRR098026.133 HWUSI-EAS1599_1:2:1:0:1978 length=35
SRR098026.fastq-#!!!!!!!!!##########!!!!!!!!!!##!#!
--
SRR098026.fastq-@SRR098026.177 HWUSI-EAS1599_1:2:1:1:2025 length=35
SRR098026.fastq:CNNNNNNNNNNNNNNNNNNNNNNNNNNNNNNNNNN
SRR098026.fastq-+SRR098026.177 HWUSI-EAS1599_1:2:1:1:2025 length=35
SRR098026.fastq-#!!!!!!!!!!!!!!!!!!!!!!!!!!!!!!!!!!
The grep command worked, but notice that it added -- as a marker whenever there were gaps
betweeen the bad reads (i.e. the good reads!). We want a properly formatted fastq file, so we
need to write a better command to get rid of the -- markers.
This command should do it!
grep -B1 -A2 NNNNNNNNNN *.fastq | grep -v '\--' > scripted_bad_reads.txt
It takes the output from the previous command, and then outputs
everything except the -- markers, and overwrites the scripted_bad_reads_.txt file.
To make a script, we’re going to create a new file to put this grep command in.
We’ll call it bad-reads-script.sh. The sh isn’t required, but using that extension tells us that it’s a shell script.
$ nano bad-reads-script.sh
Type your grep command into the file and save it as before. Be careful that you did not add the $ at the beginning of the line.
Now comes the fun part. We can run this script as a computer program. Type:
$ bash bad-reads-script.sh
It will look like nothing happened, but now if you look at scripted_bad_reads.txt, you can
see that the bad reads are now the fastq formatted reads in the file.
Making the script into a program
We had to type bash because we needed to tell the computer what program to use to run this script. Instead we can turn this script into its own program. We need to tell it that it’s a program by making it executable. We can do this by changing the file permissions.
may not have talked about permissions before, but a great reference is the Data Carpentries “Working with files” episode.
First, let’s look at the current permissions by using the -l (long) listing of ls.
$ ls -l bad-reads-script.sh
-rw-rw-r-- 1 user group 0 Oct 25 21:46 bad-reads-script.sh
Without going into great details, the permissions are most commonly
divided into three types: r “read”, w “write”, and x “execute”.
Also, the first position is reserved for descriptors, and the most
common descriptor is: d “directory”.
Finally, the 10 permission indicators are actually four separate sections:
| Position 1 | Positions 2-3-4 | Positions 5-6-7 | Positions 8-9-10 |
|---|---|---|---|
| Descriptor | Current User or Owner Permissions | Group Permissions | Everybody Permissions |
For each section, the user or group permissions can be set independently. This user-and-group model means that for each file, every user on the system falls into one of three categories: the owner/user of the file, someone in the file’s group, and everyone else. Permissions can be carefully adjusted depending on whether you are logged on as an administrator, or you are part of a specific group.
We see that bad-reads-script.sh permissions are -rw-r--r--. This shows that the file
can be read by every group or user and also written to by the file owner
(you, because you made the file, and you are the current user or administrator of your
computer). We can visualize the permissions as a table:
| user | group | everyone | |
|---|---|---|---|
| read | yes | yes | yes |
| write | yes | no | no |
| execute | no | no | no |
We want to change these permissions so that the file can be executed as a program.
We use the command chmod to change permissions for any file or directory.
Here we are adding (+) executable permissions (+x).
Windows Users: FYI about
chmod!
chmodwill work when you are logged onto (or SSH to) a remote system like Pete! But doesn’t work in the GitBash terminal on your laptop
To add “execute” permissions to a script use:
$ chmod +x bad-reads-script.sh
Now let’s look at the permissions again. Your computer may have automatically placed permissions that are different than those shown here.
$ ls -l bad-reads-script.sh
-rwxr-xr-x 1 user group 0 Oct 25 21:46 bad-reads-script.sh
Let’s look at the permissions as if they are -rwxr-xr-x.
NOTE: The
chmodcommand will change permissions for all user types when used this way, but we aren’t covering those methods at this time.
The x’s now tell us we (the owners of the file)
can run the script as a program. So, let’s try it! We’ll need to put ./ at the beginning
so the computer knows to look here (the current working directory) for the program.
$ ./bad-reads-script.sh
The script should run the same way as before, but now we’ve created our very own computer program! This is part of the fun of using the shell.
Another way to log on to a Remote System
If we want to connect to a remote system and we are already in a bash terminal,
We can use the command ssh to connect to another remote system. For example, In your Gitbash window (Windows users) or your old local bash window (Macs/Unix) you can type:
ssh <username>@pete.hpc.okstate.edu
If you see a warning about the computer not being known, type “yes” to accept the security information. You should then see a request for your password. Type in your password. NOTE: You won’t see anything when you type your password. The cursor won’t even move. That’s expected, so keep typing!
$ ssh phoyt@pete.hpc.okstate.edu
phoyt@pete.hpc.okstate.edu's password:
Last login: Thu Aug  8 12:28:36 2019 from 139.78.154.30
Welcome to Pete!
Congratulations! You have used the command-line interface to connect to a remote supercomputer, and now have two active connections!! This is a big step forward when working in genomics!
Pause for a moment
Now your training takes on new power! While we had fun learning commands and working
with files on our laptops (or desktops), it’s important to realize that now you are
on a supercomputer. The computing power available to you has now increased by a ginormous
amount (that’s a lot). We will explore some of this power later, but for now just
realize how ALL the commands you have learned, can now be applied to your home
directory on a supercomputer. Do you want to make sub-directories? Use mkdir.
Want to create a text file? Use nano. Write a script? Yep, you can do that too.
Moving and Downloading Data
So far, we’ve worked with data that is pre-loaded on the class website, and this is similar to if the data was available on an “instance” in the cloud. Usually, however, most analyses begin with moving data into the cloud instance. Below we’ll show you some commands to download data onto your computer as if it was an instance, or to move data between your computer and the cloud. For more details on a cloud instance, follow this link.
Getting data from the cloud
There are two programs that will download data from a remote server to your local
machine (or your remote instance): wget and curl. They were designed to do
slightly different tasks by default, so you’ll need to give the programs
somewhat different options to get the same behavior, but they are
mostly interchangeable.
-
wgetis short for “world wide web get”, and it’s basic function is to download web pages or data at a web address. -
cURLis a pun, it is supposed to be read as “see URL”, and it’s basic (original) function is to display webpages or data at a web address. But it downloads files also.
Which command to use mostly depends on your operating system, as most computers will only have one or the other installed by default.
Let’s say you want to download some data from Ensembl. We’re going to download a very small
tab-delimited file that just tells us what data is available on the Ensembl bacteria server.
Before we can start our download, we need to know whether we’re using curl or wget.
To see which program is installed on your operating system you should type:
$ which curl
$ which wget
which is a BASH program that looks through everything you have
installed, and tells you where the program is installed. If it can’t
find the program you asked for, it returns nothing, i.e. gives you no
results.
On Mac OSX, you’ll likely get the following output:
$ which curl
/usr/bin/curl
$ which wget
$
This output means that you have curl installed, but not wget.
Windows users with GitBash installed will likely see this:
$ which curl
/mingw64/bin/curl
Once you know whether you have curl or wget use one of the
following commands to download the file:
$ cd
$ wget ftp://ftp.ensemblgenomes.org/pub/release-37/bacteria/species_EnsemblBacteria.txt
or
$ cd
$ curl -O ftp://ftp.ensemblgenomes.org/pub/release-37/bacteria/species_EnsemblBacteria.txt
Since we wanted to download the file rather than just view it, we used wget without
any modifiers. With curl however, we had to use the -O flag, which simultaneously tells curl to
download the page instead of showing it to us and specifies that it should save the
file using the Original name it had on the server: species_EnsemblBacteria.txt
It’s important to note that both curl and wget download to the computer that the
command line belongs to. So, if you are logged into a remote cloud on the command line and execute
the curl command above in the cloud’s terminal, the file will be downloaded to your remote
machine, not your local one.
Transferring Data Between your Local Machine and the Cloud
What if the data you need is on your local computer, but you need to get it into the cloud? There are also several ways to do this, but it’s always easier to start the transfer locally. Important: For this exercise the terminal you are typing in should be your local computer terminal (not one logged into your remote system). If you’re using a transfer program, use the one installed on your local machine, not your instance.
Moving files with SCP
scp stands for ‘secure copy protocol’, and is a widely used UNIX tool for moving files
between computers and should be installed already. The simplest way to use scp
is to run it in your local terminal, and use it to copy a single file:
scp <file I want to move>: <where I want to move it>
Note that you are always running scp locally, but that doesn’t mean that
you can only move files from your local computer. You can move a file:
$ scp <local file>: <remote cloud instance>
Then move it back by re-ordering the to and from fields:
$ scp <remote cloud instance>: <local file>
Uploading Data to your remote computer with scp
Open the terminal and use the scp command to upload a file (e.g. local_file.txt) to the remote home directory.
- the cloud instance on Cyverse:
$ scp local_file.txt <remote-username>@ip.address:/home/<remote-username>/ - AWS
$ scp local_file.txt <remote-username>@EC-number-ip.address:/home/<remote-username>/ - For the Pete supercomputer
$ scp local_file.txt <username>@pete.hpc.okstate.edu:/home/<username>/
You may be asked to re-enter your password. Then you should see the file name printed
to the screen. When you are back at your command prompt, switch to the Pete Terminal
and use ls to make sure the file local_file.txt is now in your home folder.
Downloading Data from a remote computer with scp
Let’s download a text file from our remote machine. You should have a file that contains bad reads called ~/shell_data/scripted_bad_reads.txt.
Tip: If you are looking for another (or any) text file in your home directory to use instead try
$ find ~ -name *.txt
Cloud computer instructions can be slightly different
When we are on a cloud system like Cyverse, we would download the bad reads file in ~/shell_data/scripted_bad_reads.txt to our home ~/Download directory using the following command (make sure you substitute your remote login credentials for “<username>@remote-IP-address”):
- Cyverse
$ scp <remote-username>@ip.address:/home/<remote-username>/shell_data/untrimmed_fastq/scripted_bad_reads.txt. ~/Downloads - AWS
$ scp <remote-username>@EC-number-ip.address:/home/<remote-username>/shell_data/untrimmed_fastq/scripted_bad_reads.txt. ~/Downloads
Remember that with both commands, they are run from your local machine, and we can flip the order of the ‘to’ and ‘from’ parts of the command. These directions are platform specific so please follow the instructions for your system:
Keypoints:
- Scripts are a collection of commands executed together.
- Transferring information to and from virtual and local computers.